本文的书面步骤是主要操作依据。
视频与截图仅作辅助演示。操作前请遵循书面步骤,并确认当前页面、账户、注册管理机构与资源状态。
For the i.lease / idolist Buy workspace
This guide explains how to use the Buy module in i.lease to publish a buy request, track incoming bids, complete payment, and sign the SPA after a match is confirmed.
The guide focuses on the operational flow inside Buy > My Listings, Buy > My Bids, Pay Now, and SPA Sign.
Before You Start
- Make sure your company has access to the Buy workspace in idolist.
- On first access, i.lease may require you to review and sign Platform Bidding Terms & Conditions (MAS) before using Buy or Sell.
- Prepare the target subnet size, preferred RIRs, and the unit price range you are willing to accept.
- Confirm that your payment method and company information are ready in case the request is matched quickly.
Main Pages in Buy
| Page | Purpose | Typical next action |
|---|---|---|
| Marketplace | Browse currently available sell-side opportunities that can be bid or bought out. | Search, filter, and decide whether to submit a buy action. |
| My Listings | Create and track your buy requests. | Add a new buy listing, open detail, and review bid progress. |
| My Bids | Track bid-side actions that are assigned to your account. | Continue to pay-now, sign, bid again, or review matched transactions. |
Step 1: Open Buy > My Listings
Use Buy > My Listings as the main operational page for demand creation and follow-up. Each card represents one buy request and shows the subnet size, bidding activity, current best bid, and current transaction stage.
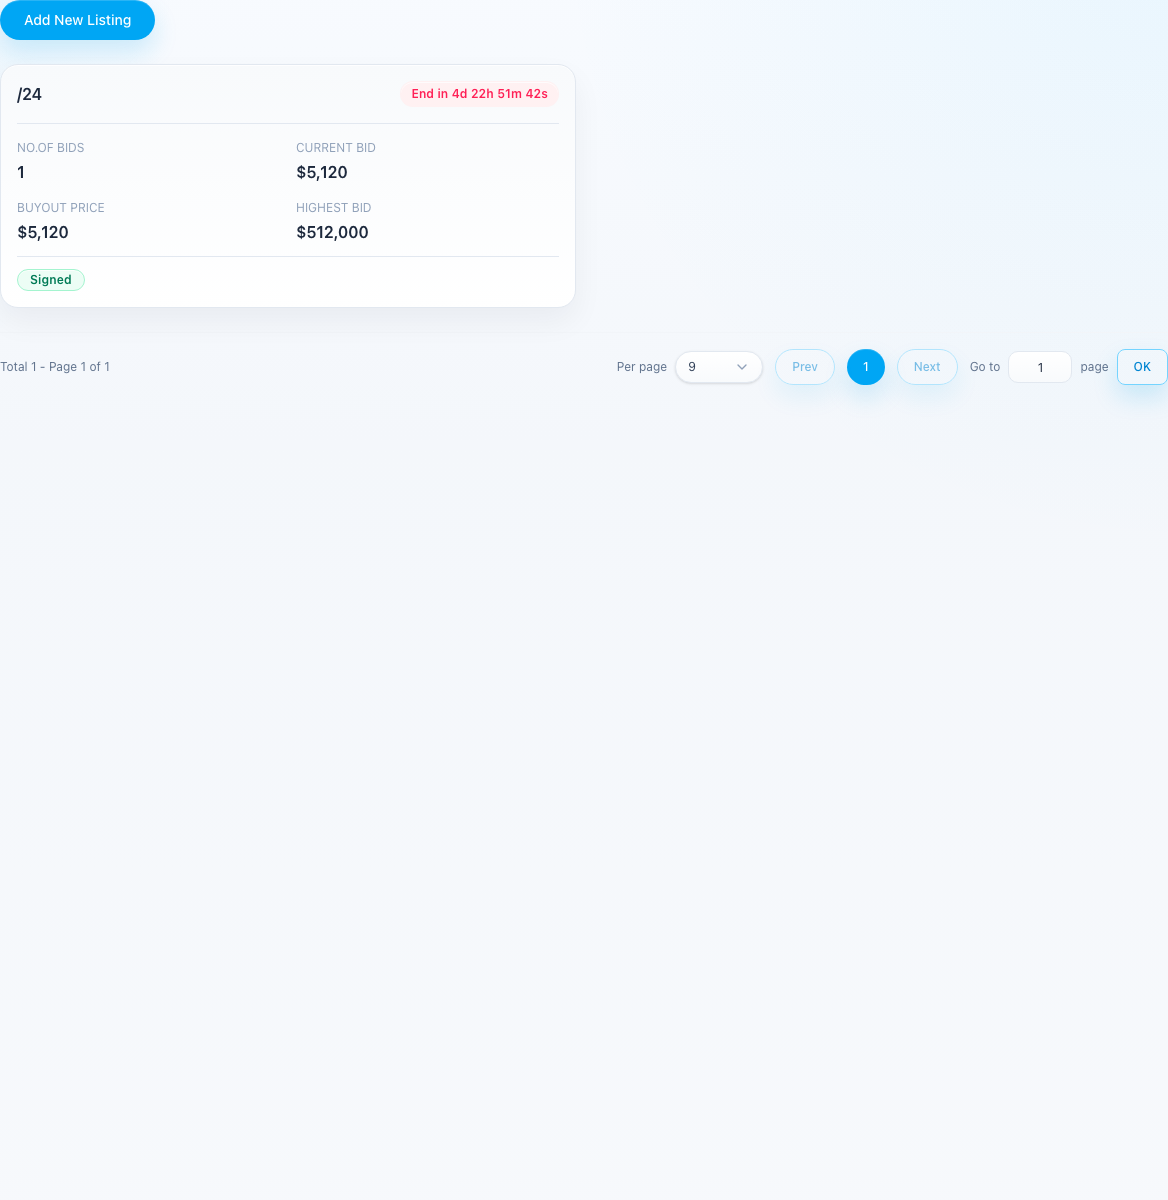
- Review existing cards to see which requests are already active or matched.
- Check the status label shown on the card to understand whether action is still required.
- Use Add New Listing to publish a new buy-side request.
Step 2: Create a New Buy Request
Click Add New Listing and complete the buy request form. In the Buy module, you are defining the size and pricing conditions of the IP space you want the marketplace to source for you.
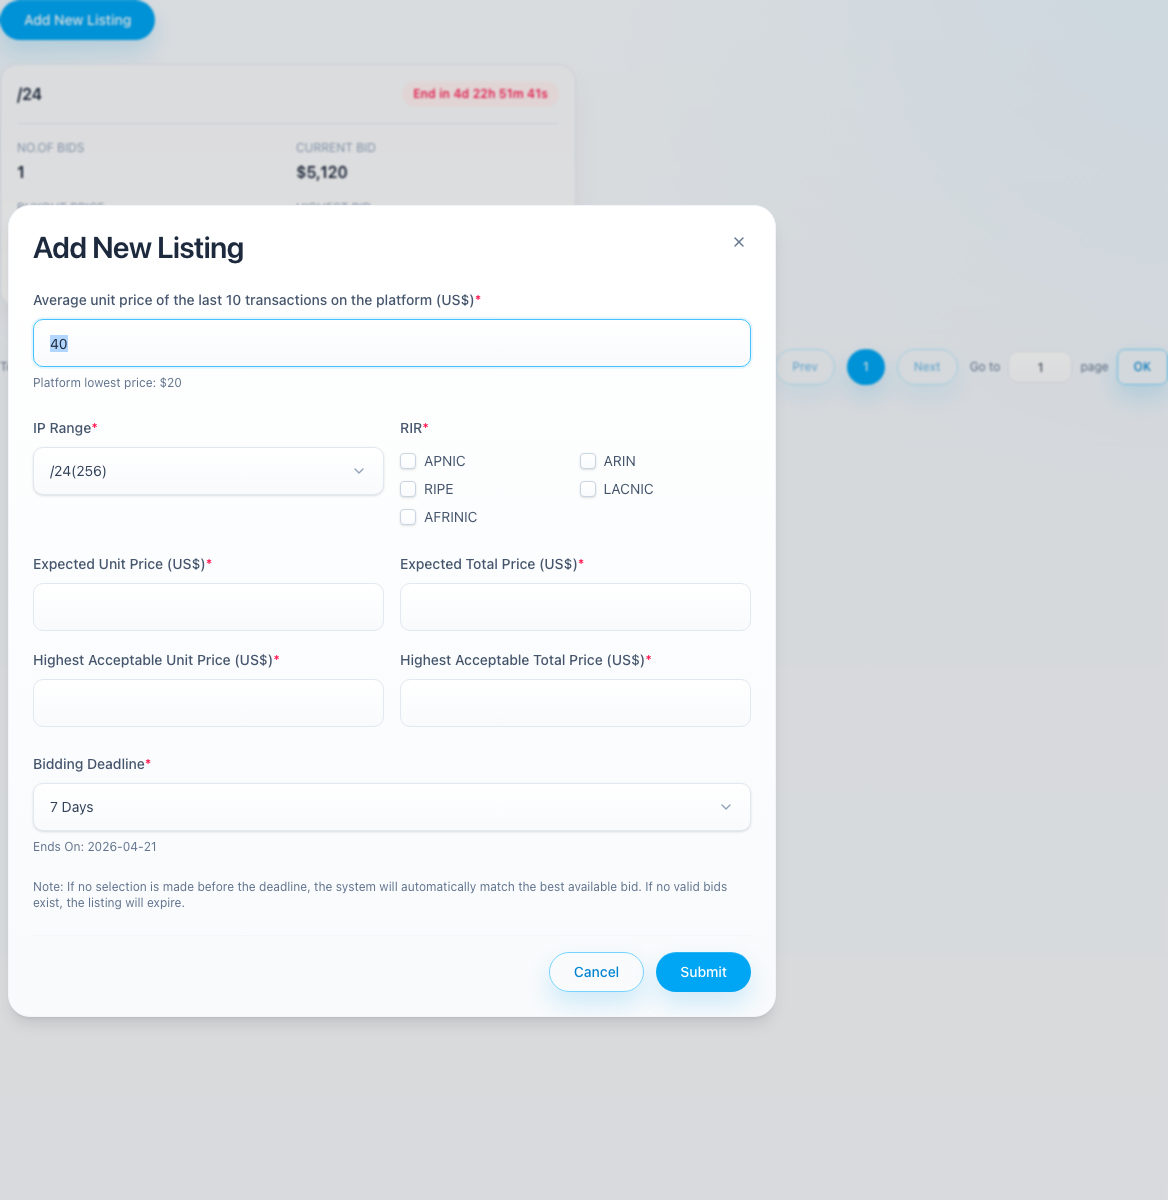
- Review the Average unit price shown by the platform as a current market reference.
- Select the target IP Range, such as
/24 (256). - Select one or more acceptable RIR options.
- Enter the Expected Unit Price and Expected Total Price.
- Enter the Highest Acceptable Unit Price and Highest Acceptable Total Price. This defines your ceiling.
- Set the Bidding Deadline. The page also shows the calculated end date.
- Click Submit to publish the request.
Use realistic price boundaries. If your ceiling is too low, the request may receive no valid bids before the deadline.
Step 3: Review Bid Progress in Listing Detail
Open any request card to enter the detail page. This page is where you review the full pricing context, current best bid, bidder history, and extension status for that buy request.
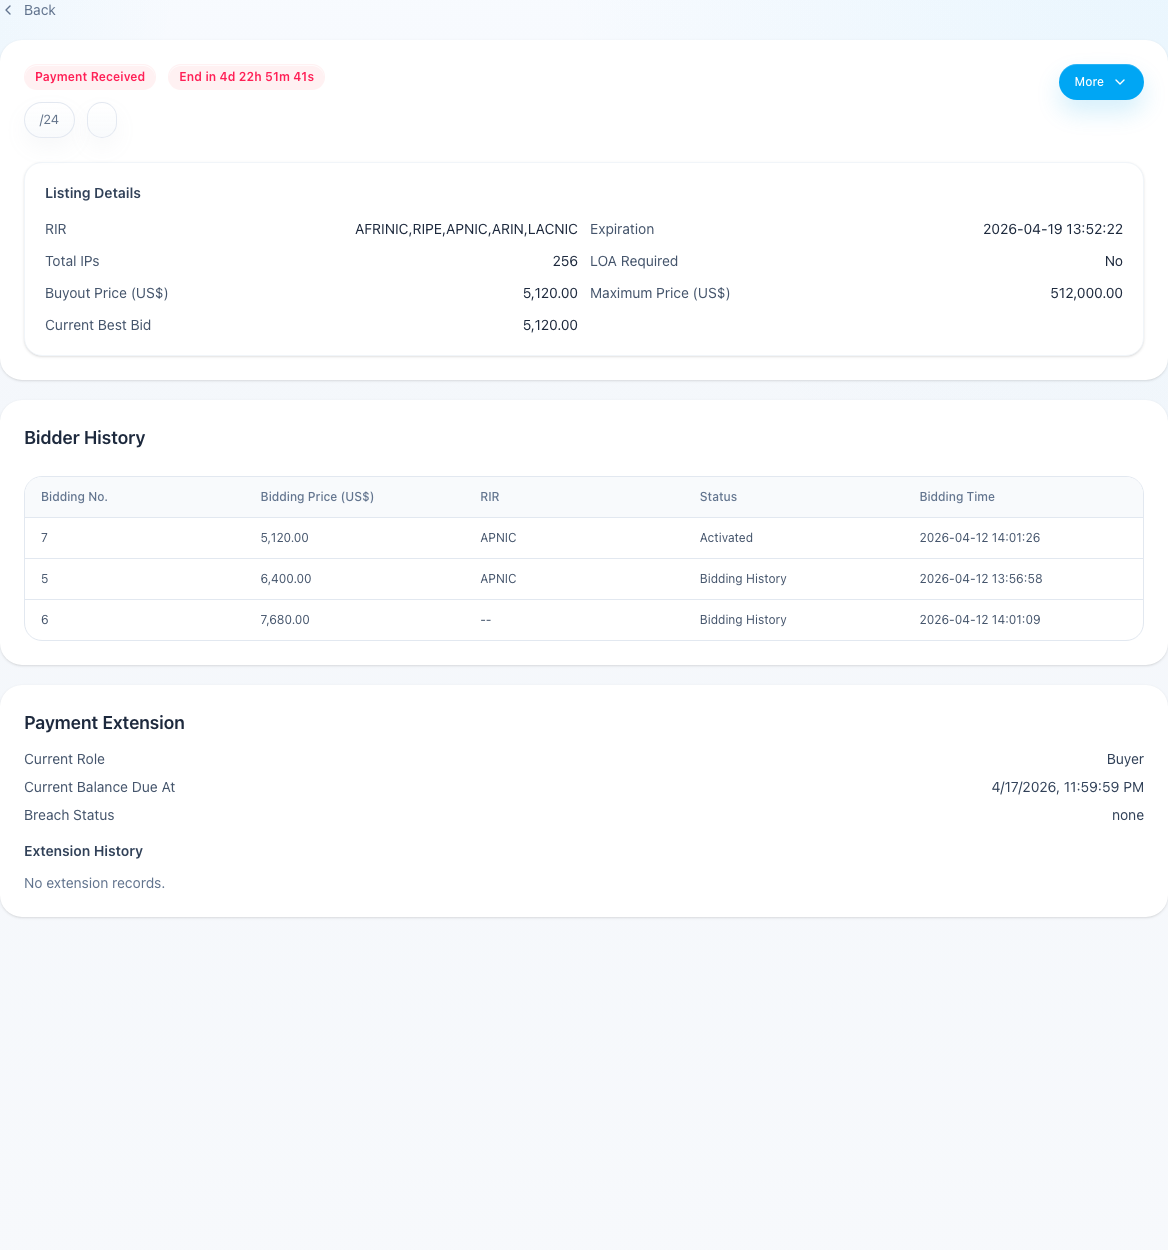
- Check RIR, Total IPs, and the price fields to confirm the request matches your intent.
- Review Current Best Bid to see the best active response from the market.
- Use Bidder History to compare historical bids, timing, and status changes.
- Check the header status, such as Payment Received, to understand whether the request has already advanced to the transaction stage.
- Review Payment Extension if the case is already in a payable window and an extension workflow is relevant.
Step 4: Complete the Pay Now Stage When the Transaction Is Matched
When a buy request is matched, i.lease can direct you to Pay Now. This page shows the payable amount, payment options, due time, and order summary. Follow the options displayed on your current page, because available methods can vary by account and transaction state.
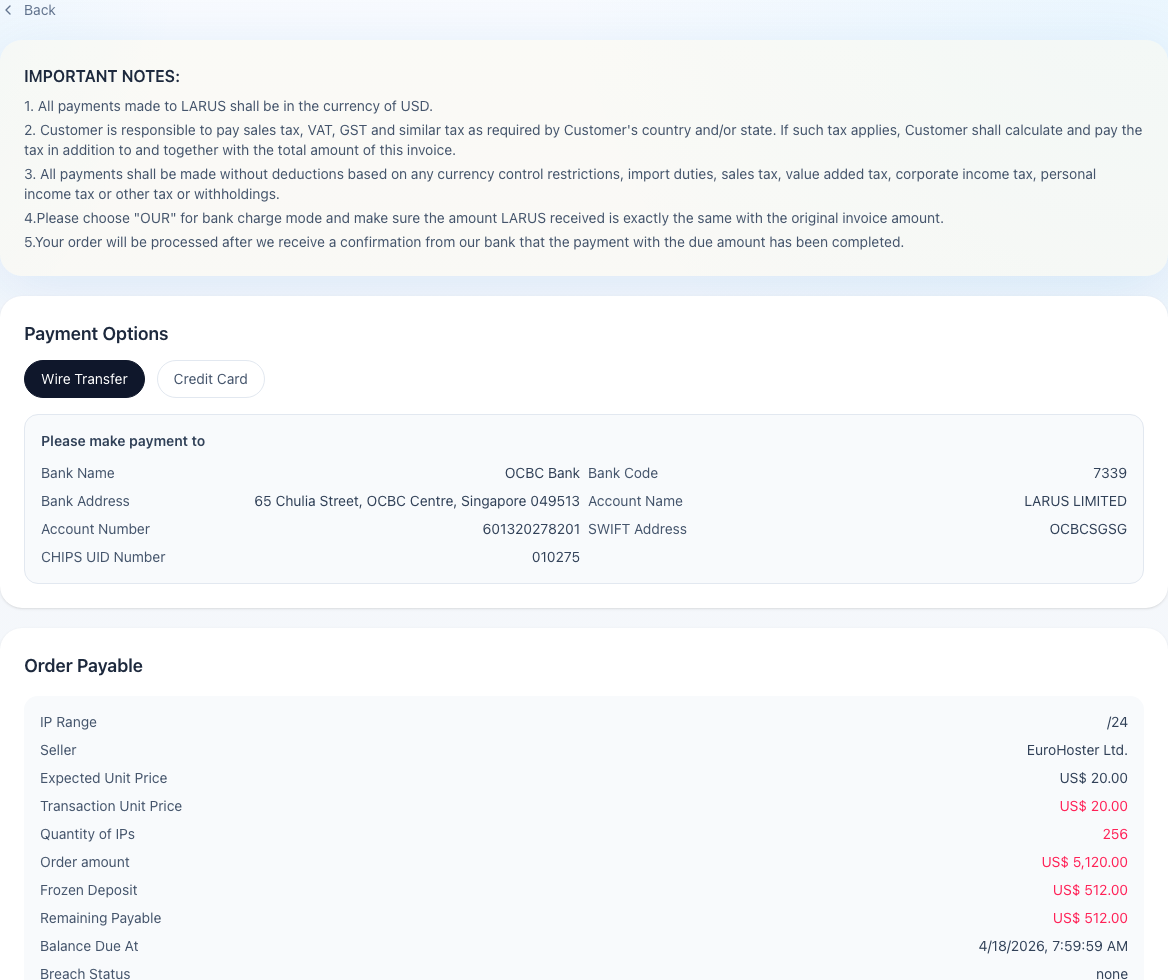
- Review the IP Range, Transaction Unit Price, and total quantity.
- Check Order amount, Frozen Deposit, Remaining Payable, and Platform Service Fee.
- Review the Balance Due At field carefully to avoid breach or timeout issues.
- Choose the available payment method, such as Wire Transfer or Credit Card.
- If the page requires proof, upload the transfer voucher in the Upload Payment Proof area.
Step 5: Sign the SPA
After payment reaches the correct stage, continue to the SPA signing page. This page shows the case number, your role, signature status for both parties, and the contract preview/download actions.
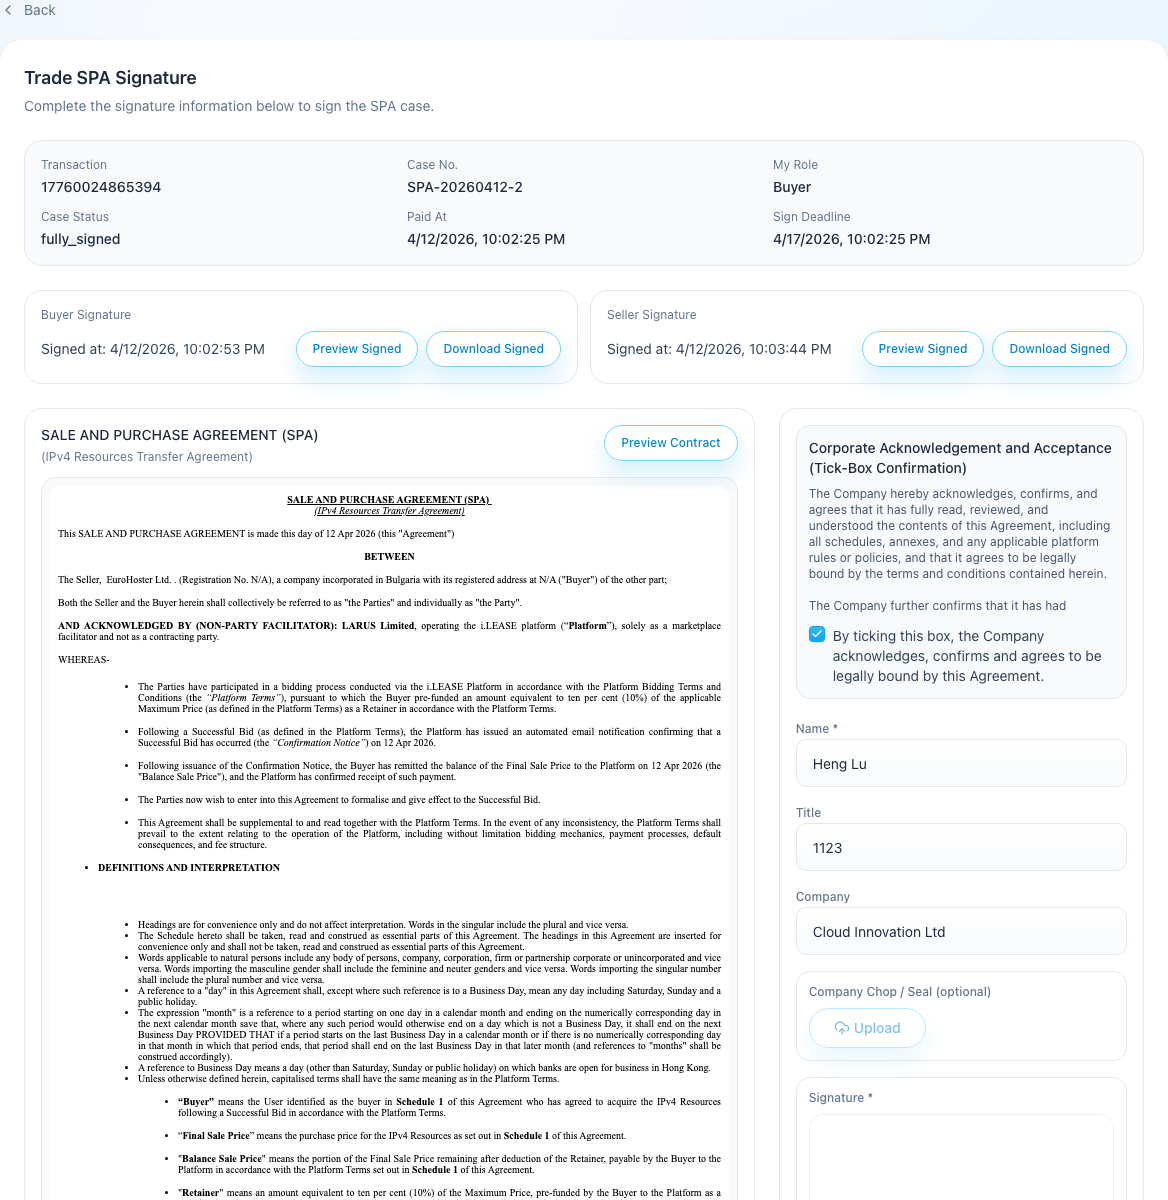
- Confirm the Transaction number, Case No., and My Role.
- Review Case Status, Paid At, and Sign Deadline.
- Use Preview Contract to review the SPA before signing.
- Review the buyer and seller signature blocks to confirm whether either side has already signed.
- If the case is still signable, complete the signature fields and submit the confirmation.
If the page says This SPA case is currently not signable, the case has already progressed past the interactive signing step or is waiting on a different backend state.
Related Operational Notes
- Marketplace is used to browse live sell-side opportunities. It is not the same as your own demand list.
- My Listings is the primary place to manage the buy requests you created.
- My Bids can stay empty until the system creates actionable bid-side records for your account.
- Different statuses expose different actions, such as pay now, sign, bid again, or extension review.
Quick Workflow
- Open Buy > My Listings.
- Use Add New Listing to create a buy request.
- Track bids and pricing on the listing detail page.
- When matched, finish the Pay Now step.
- Complete SPA review and signing when the case becomes signable.